
In FL Studio, you can make use of sends to send effects to inserts. This is used when you want to apply the same effects on multiple inserts. For example, if you have a high quality reverb effect plugin that uses a lot of CPU power it might be wise to place it on a send instead of running multiple instances of it on several inserts. Here's how it's done:
1. The difference between the insert and the send
The way an insert works is that it receives signal on one side, and outputs it on the other. Before it outputs it though, you have the possibility of using up to 8 effects slots. In FL Studio, you can set up your inserts to receive whatever inserts you like and also output to any other insert of your choice.
The send doesn't work the same way (even though it looks very much alike). The send can also hold up to 8 effects, but rather than receiving signal and outputting it somewhere else, what you should picture it doing is "applying" the effects to the inserts you set it up to. This means that you have to set up the effects differently for it to work properly. The sends often cause confusion for some people because of the way FL Studio displays them. They look just like inserts, and when you first click on them, there are no knobs to send anywhere! Well, that's because sends are passive and the way they are displayed depends on your selection in the mixer. Read on...
2. Routing an instrument to an insert
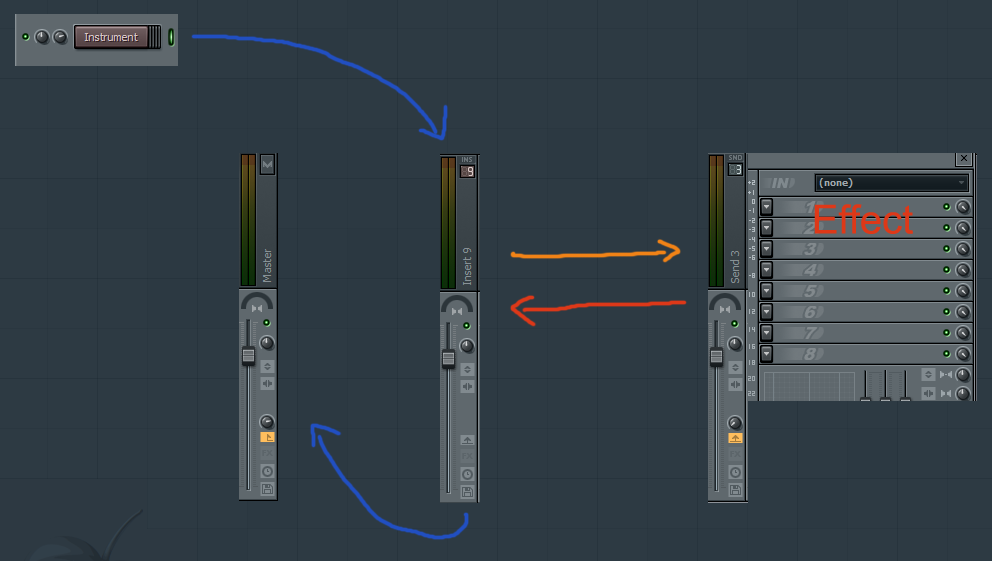
Simply add an instrument channel to your list by clicking on "Channels > Add one > FL Keys", so you have something to work with. In this case, a piano.

Click on the instrument in the channel list. The way that FL Studio works, is that by default every instrument you add will run straight into the master channel in the mixer. When you play the instrument, you will see the volume indicator on the master react. It is generally not a good idea to route instruments straight to the master because you will usually want to apply some sort of effects on your instruments.
To do this, make sure you have selected your instrument, then rightclick on an empty insert in your mixer and select "Link selected channels > To this track".

You can also simply left click on an empty insert and hit CTRL + L on your keyboard. FL will automatically rename the insert for you. Now, if you play the instrument you will see that both, the insert and the master volume indicators react. This is because the instrument now runs through the insert, and the insert outputs the signal to the master. It's like a short detour.

Nice
3. Setting up the send
Click on an empty send and rename it "Reverb Send" by middle mouse clicking it, or by pressing F2 after selecting. Now click on one of the arrows on the effects rack and choose a reverb effect. I used Fruity Reverb 2.

Due to the reason that the send is going to "apply" this reverb effect to a certain insert, you need to make sure that you lower the "dry" signal of the effect to 0. If you don't do this, the original signal will be added onto itself and you will have an unwanted increase in volume. Instead, lower the dryness completely and you're left with only the wet sound the reverb produces. You can increase that up to 100% like I did

Until now the send will not do anything to our instrument. We will now make that work.
4. Sending
In this final step, select your insert. You will see that the volume knobs on all 4 sends are turned all the way down. This means that nothing is applied onto the insert.

If you increase the volume knob on the send, you will start to hear the added effect on your instrument.

Of course, you don't have to put the knob at 100%. You can tweak it to your liking, even if the reverb effect itself is on full blast. Very useful.
If you add another instrument, and route it to another empty insert, you can apply the same send onto this as well. This way, multiple inserts can share the same effects for a consistent sounding and CPU saving approach.
From here, it's all about tweaking and getting the right sound for your production.
Thanx a lot. Now I understand better
ReplyDeleteme too i am enlightened witht the knowledge
ReplyDeleteThanks for the tips i make tracks and sometimes i'm in a rush to do a mix so i can play it out at my Mobile Disco Nights will be using this technique it may help to quicken things up.
ReplyDeleteI just got one question! What happens if an effect has NO dry/wet knob? Like Fruity Free Filter. What then? Thanks in advance!
ReplyDeleteI find out the solution myself! I'm just posting here to help others! You just have to turn all the way down the knob of the master channel so it doesn't interfere with the send channel! That is all :)
DeleteThis comment has been removed by the author.
DeleteThank You... very clear!
ReplyDeleteThanks man. The one thing that kept me away from sends was the dry signal problem. Thanks for clearing that up man!
ReplyDeleteThanks. Clearly explained and brief.
ReplyDeleteDownload hottest loops and samples for FL Studio from www.quasarsounds.com
ReplyDeleteAwesome blog thx u a lot , btw I have a question to producers have u ever used this sample pack?
ReplyDeletehttps://www.lucidsamples.com/hip-hop-samples-packs/68-vinyl-cut-chords-download.html
hello i saw your post its very attracting to me, i bookmark your website for next visit,
ReplyDeleteyour website design also good here is also my website please view my website to know my weakness thanks
FL Studio 2018 Free
Thanx a lot. Now I understand better These types of similar Things i also have found there just have a look on it
ReplyDeletehttps://techilover.com/fl-studio-mobile-apk-obb-free-download-for-android/
Fix your Outlook Account Sign in, Login or Sign up issue by Microsoft Outlook mail customer helpline number USA 1-818-492-9002. We fix all Outlook Account issue like Sign in, Sign up, login, password issue etc.
ReplyDeleteyour posting style is very awesome thanx for sharing keep it up........Vectric Aspire 9.5 Patch with Full Crack 2020 Free Download
ReplyDeletegreat tips you provide us thanx for sharing keep it up.4K Video Downloader Crack
ReplyDeletegreat tips you provide us thanx for sharing keep it up.Movement Output Crack
great tips you provide us thanx for sharing keep it up.Accusonus ERA 5 Bundle Crack
great tips you provide us thanx for sharing keep it up.Apple Logic Pro X Crack
great tips you provide us thanx for sharing keep it up.FL Studio Mobile Crack
So nice I am enjoying for that post as for u latest version of this Security tool.
ReplyDeletekey4pc.com
fl-studio-crack
Such a Nice post. Thanks for Awesome tips Keep it up
ReplyDeletefl studio crack
Thanks for sharing your knowledge to install & crack the Time Tables, but you need to update
ReplyDeleteit now. because there is a 2022 version available now.
freemake-video-converter
mkvtoolnix
xmind-pro
fl-studio
backup4all-pro-crack
ReplyDeleteSo nice I am enjoying for that post as for u latest version of this Security tool Available
fl-studio-crackmovavi-photo-editor-crack
sidify-music-converter-mac
capture-one-pro-crack
bwinx-hd-video-converter-deluxe-crack
Appreciation is a wonderful thing...thanks for sharing kepp it up.
ReplyDeletevpn-avira-phantom/
sandbox
fl-studio
https://flstudio20crackdl.blogspot.com/2022/02/fl-studio-20-crack-with-registration.html
ReplyDelete